These Instructions have been provided by On-Site / SurfNJ
Technical Support to describe a typical Network and Dialup configuration for a stand alone
type system. This document is in no way supported by On-Site / SurfNJ Internet Technical
Support (support@onsitenj.com). On-Site / SurfNJ Internet will not be held responsible for
any loss of data or connectivity problems to other networks that may occur by using the
information contained within these instructions. MODEM SETUP:
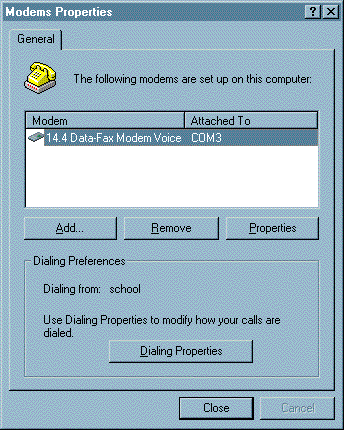
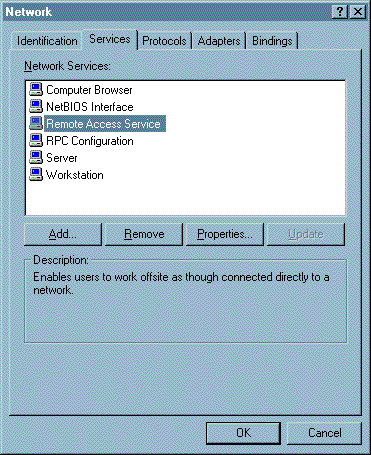
From the Control Panel double click on the Network
icon to bring up the Network Control Panel window. Once this window is open, click
on the Services tab and verify that "Remote Access Service" has
been installed. If this service is already installed, you may continue on to the next step
by single clicking on this service to highlight it, and then clicking on the Properties
button. If you do not have the service listed within the Network Services
window, you must first install it by clicking on the Add... button and then double
clicking on "Remote Access Service". This will automatically bring you
back to the main Network Services window, and register the service as being installed on
your system. From this point, single click on the "Remote Access Service"
service to highlight it, and then click on the Properties button to continue. |
 |
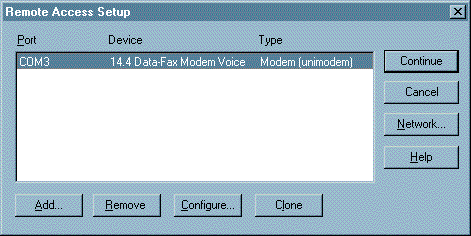
In the Remote Access Setup window, we need to verify
two different separate options which are accessible only through the Configure,
and Network buttons. Start by clicking on the Configure button and verifying
that the following information is correct. |
|
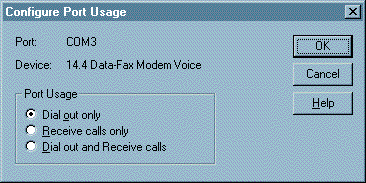
| In the Configure Port Usage window, make sure that the radio button is set to "Dial
out only". Once this has been done, click on the OK button to return to
the Remote Access Setup window. From here, verify the information located in the second
option by clicking on the Network button. |
|
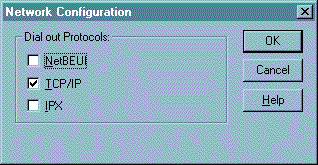
Within the Network Configuration window, verify that "TCP/IP"
is the only dial out protocol selected. Once this has been done, click on the OK
button to return to the Remote Access Setup window. From here, click on the Continue
button to return to the main Network Control Panel window. |
 |
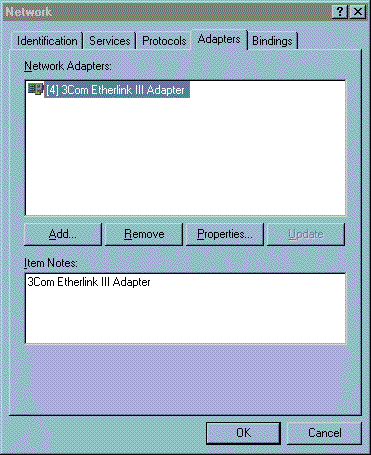
| Since Windows NT is designed to have a network adapter installed on the system to
function properly, you must install the appropriate driver for your "Network
Interface Card" or "NIC" for short. This can be done by clicking
on the Add... button located in the Adapter tab of the Network Control
Panel and selecting your particular "Network Card" from the provided
list. If you are unsure what type of "Network Card" is installed on you
computer, or you do not see your particular card listed within the menu, you should
consult the manual or vendor for further assistance. |
|
Note: If you do not have a "Network Card"
installed on your system, you must install the "MS Loopback Adapter" to
emulate the presence of a Network Card. To add this emulator, click on the Add...
button located in the Adapter tab of the Network Control Panel and then
select "MS Loopback Adapter" from the selection menu.
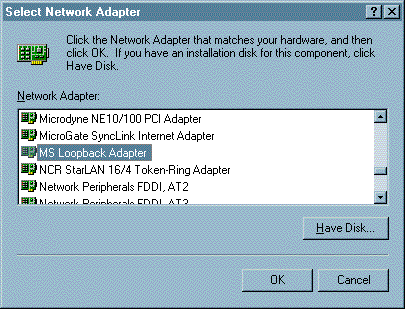
Example: Clicking on the Add... button located in the Network Control
Panel / Adapters window will display the following menu. From this menu, double click
on the entry name for the appropriate "Network Card" installed on your
system (Note: if you do not have a "Network Card" installed, select the "MS
Loopback Adapter"). After this is done, you should be returned to the main Adapters
window |
 |
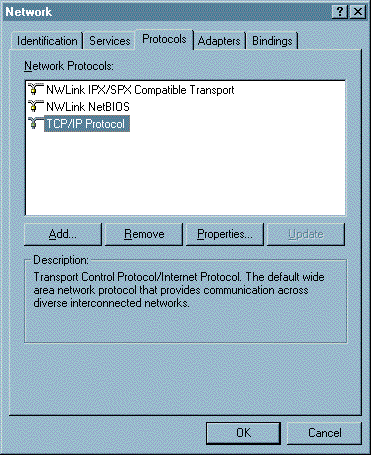
| Next, click on the Protocols tab and verify that the "TCP/IP
Protocol" has been installed. If it has been installed previously, such as during
the initial Install, you may continue on to the next step by single clicking on this
service to highlight it, and then clicking on the Properties button. |
|
If you do not have this Protocol listed within the Network
Control Panel / Protocols window, you must first install it by clicking on the Add...
button and then double clicking on "TCP/IP Protocol" from the scrollable
menu. This will automatically bring you back to the main Network Protocols window,
and register the protocol as being installed on your system. From this point, single click
on the "TCP/IP Protocol" to highlight it, and then click on the Properties
button to continue. Example: Clicking on the Add... button located in
the Network Control Panel / Protocols window will display the following menu. From
this menu, scroll down until you find the "TCP/IP Protocol", and then
double click on the protocol to install it. Once this has been done, you should
automatically be returned to the main Protocols window. |
 |
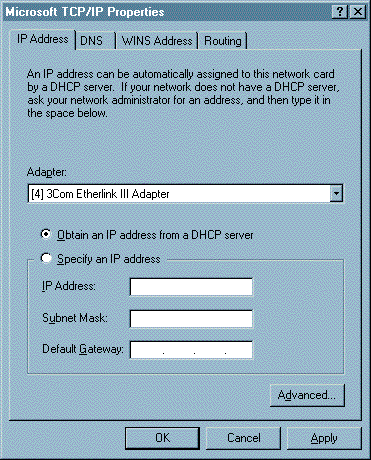
In the TCP/IP Protocol Properties window, click on the IP
Address tab to verify the settings for your "Network Card". Next move
the radio button from "Obtain an IP Address from a DHCP Server" to "Specify
An IP Address". Once this has been done, enter in the appropriate IP address and
Subnet for your local TCP/IP based network. If you are unsure what these addresses are,
you should contact your network administrator for further assistance. If you installed the
"MS Loopback Adapter" as your primary network card, or if your current
network card does not participate on a TCP/IP based network, you should use the following
IP addresses indicated below.
| IP Address: |
= |
192.168.0.1 |
| Subnet Mask: |
= |
255.255.255.0 |
| Default Gateway: |
= |
Leave Blank |
Note: Do not specify any On-Site / SurfNJ assigned
IP Address within the "IP Address" field (Unless instructed to by
On-Site / SurfNJ personel). This creates a routing problem that will seriously
affect all online communications. |
|
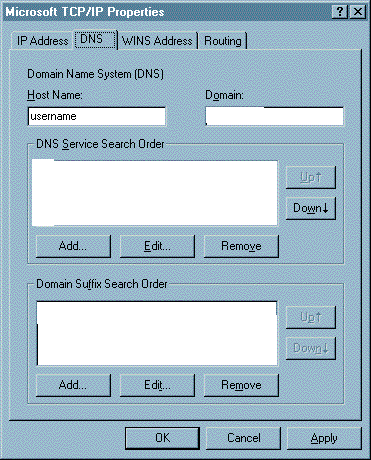
Next, click on the DNS tab and fill in the "Host
Name:" field with your specific login username. In The "Domain:"
field, enter in "nothing". If you are unsure what your login name is,
look on the Account Information Form that was either faxed or mailed to you when you first
opened up your account. Next add in "207.207.223.2", and
"207.207.208.10" in the "DNS Service Search Order" section by
clicking on the Add... button, and then entering in each address. Once this
has been done, Click on the OK button for each open Control Panel window to
return to the desktop. If you have installed any drivers or services, Windows NT will
prompt you for your installation CD to install the necessary software. After all of the
files have been successfully copied to your computer, you will be prompted to restart the
system. You should go ahead and click on OK to restart the machine before
continuing on. |
 |
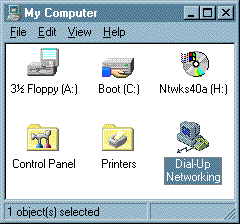
| Double click on My Computer and then on Dial-Up Networking. |
|
In the Main Dial-Up Networking window, click on the More
button and select "Edit Entry And Modem Properties". This will open up a
window allowing you to configure the necessary dial out options |
 |
| Click on the Basic tab and type in "On-Site / SurfNJ" within
the "Entry Name:" Field. After you have done this, look at your Account
Information Form and select an access number which is local to your service area. This
number should be entered into the Phone Number: field.You should verify that this number
is local to your calling area by contacting your local operator or On-Site / SurfNJ
Support. |

|
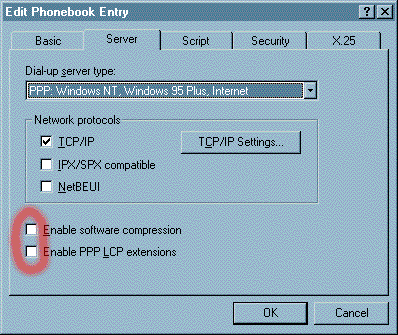
Within the Server tab, you should set the "Dial-up
Server Type" to "PPP:Windows NT, Windows 95 Plus, Internet". In
the network protocols, make sure that only "TCP/IP" is selected and that
everything else is unchecked. Also, make sure there is NOT
a check next to "Enable Software Compression" or next to "Enable
PPP LCP extensions". Since there have been a few reports about this option
causing intermittent connectivity problems, it is recommended to uncheck this option if
any connectivity problems arise as a direct result. Next, click on TCP/IP
Settings to configure the TCP protocol for dial out. |
 |
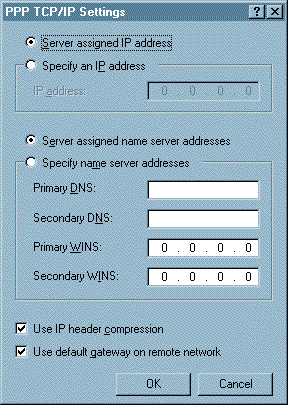
In the TCP/IP Settings window, verify that the radio button
is set to "Server Assigned IP Address". This will allow the server to
automatically assign your machine an IP address when the dial up connection is established
This works for both Static and Dynamic IP customers. Next, specify the name server
addresses by moving the radio button from "Server Assigned Name Server
Addresses" to "Specify Name Server Addresses". By doing this,
you should see the entry fields below change from gray to white. Once this has been done,
enter in the following IP addresses in their corresponding fields.
| Primary DNS: |
= |
207.207.223.2 |
| Secondary DNS: |
= |
207.207.208.10 |
| Primary WINS: |
= |
0.0.0.0 |
| Secondary WINS: |
= |
0.0.0.0 |
Also, verify that both "Use IP header
compression" and "Use default gateway on remote network" are
selected by placing a check in the box next to each one. |
|
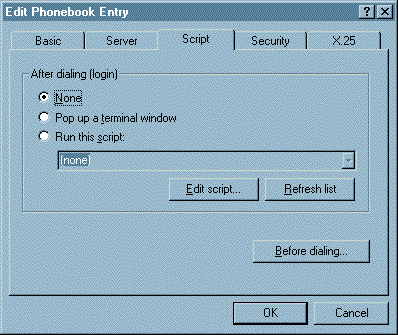
In the Script tab you should place a dot next to "None"
|
|
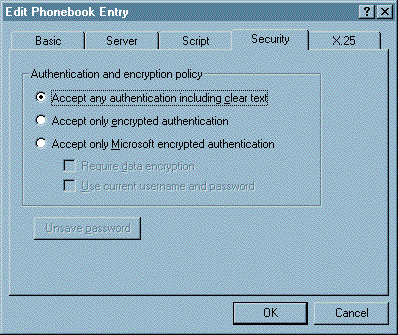
| In the Security Tab, You need to verify that "Accept any authentication
including clear test" . This is very IMPORTANT
On-Site / SurfNJ does not use encryption for dial up logins, that feature is ONLY for
dialing into other Windows NT machines. From this point, single click OK
button to accept these changes. After this is done, you should be returned back to the
main Edit Phonebook Entry window. |
|
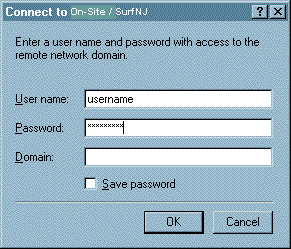
When you click Dial button in the main screen the
dialog box will appear. Make sure there is nothing in the "Domain" line.
By checking the "Save Password" box the dialog box will only appear the first
time you connect or if your password incorect. |
 |